Are you looking for a way to add PayPal donate button on your WordPress website?
No matter what type of charity you choose, it will go a long way in helping non-profit organizations (NGOs), marketing or political campaigns, or blogging websites that need assistance in their initial stages.
Several WordPress plugins can be used to collect donations but nothing compares to the simplicity, functionality, and security of the PayPal donate button.
To add a PayPal button on your WordPress website, there are several ways, but we are going to focus on the easiest, which is through a PayPal Button Elementor Widget from Mighty Addons.
So, let’s get started!
How to add a PayPal Donation Button to your website?
Install the required plugins
Since the PayPal Button widget is one of the Mighty Addons’ premium widgets, so to use it, you must first install the following plugins and activate them. I am assuming that you are using the Elementor page builder as this widget will work only with Elementor only.
- Mighty Addons (Free version)
- Mighty Addons Pro (click here to upgrade to the pro version)
Drag the PayPal Button widget
Once you are done with installing the above-listed plugins, now either create a new page using Elementor or edit any existing page where you want to add a PayPal button to accept the donation from the audience.
You can now add the PayPal donation button by searching for the PayPal button in the left sidebar and dragging it to the right of your page.
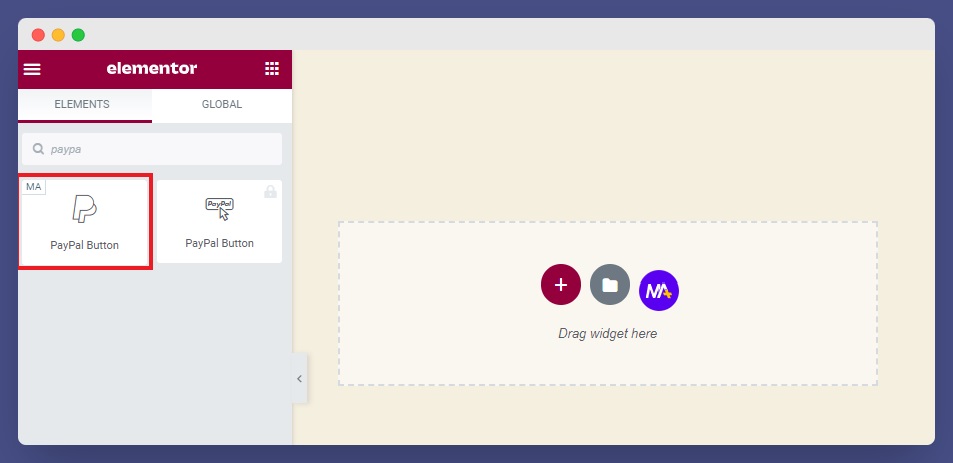
As soon as you drop the PayPal widget to the editor screen, it will add a beautiful-looking interactive button on your screen. You can customize it as per your design requirement.
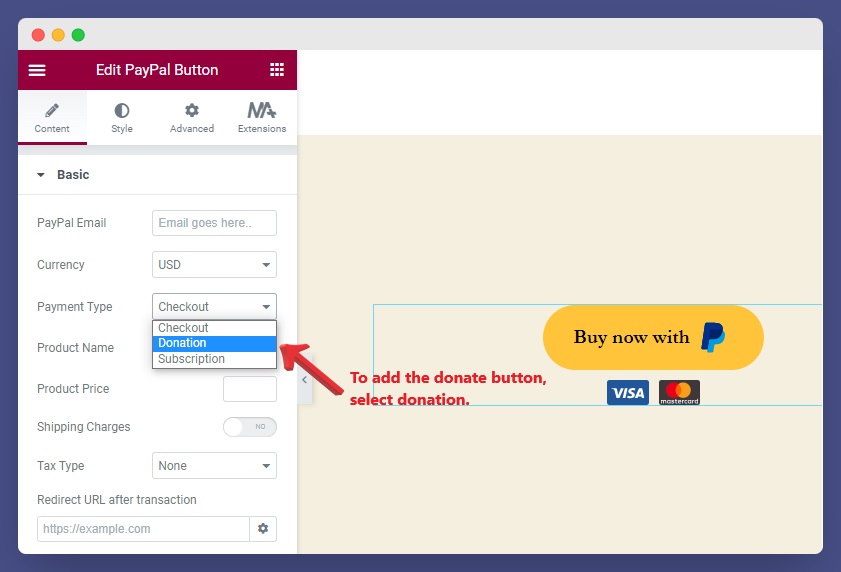
One more thing to know, with the Mighty Addons PayPal Button widget, you can add three types of payment modes:
- Checkout
- Donation
- Subscription
As this article is about adding a donation PayPal button so we will learn Donation feature first and then we will cover each of this one by one.
Add PayPal Donation Button
As soon as you select the Donation option from the Payment Type drop-down menu, you will see the following details as per in the screenshot below:
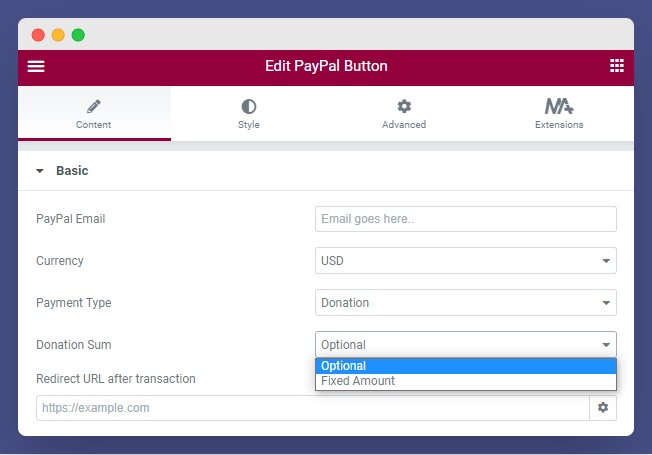
How to Configure PayPal Donate Button
- PayPal Email: This is the mail where you want to recieve the donation payments.
- Payment Type: As discussed above, select Donation from the dropdown.
- Currency: The default selection is U.S. dollars, but you can choose a different currency if needed.
- Donation Sum: You can either keep it to a fixed amount or provides flexibility to donors by selecting optional.
- Redirect URL after transaction: You may enter the URL here if you want to redirect your donors to a specific thank you page or provide them with additional information.
Customize PayPal Donate Button
Once you are done with adding the PayPal donate button, it’s time to customize it.
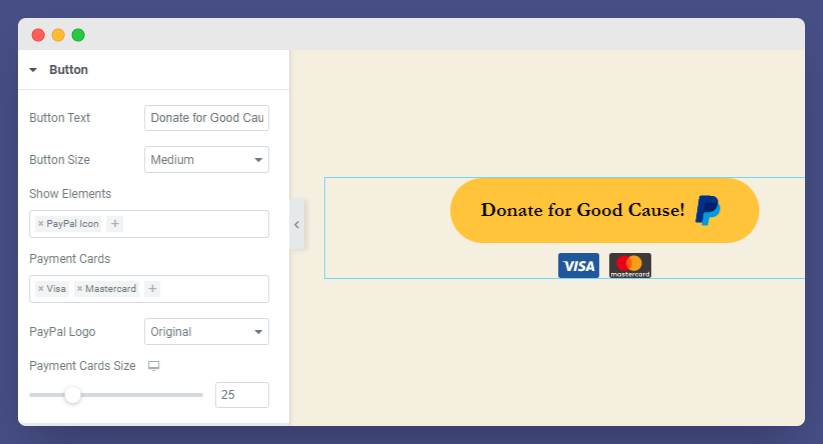
As shown in the screenshot above, the following fields can be customized as per your preferences:
- Button Text: You can add a description of what people should do with this button.
- Button Size: Select the button size: small, medium, or large.
- Show Elements: Select to display the PayPal icon or text on your button.
- Payment Cards: The widget allows you to display up to four cards at a time, and you can choose any of them or all of them.
- PayPal Logo: Select the PayPal logo to either Original or White.
- Payment Cards Size: Choose to make the payment cards larger for better visibility.
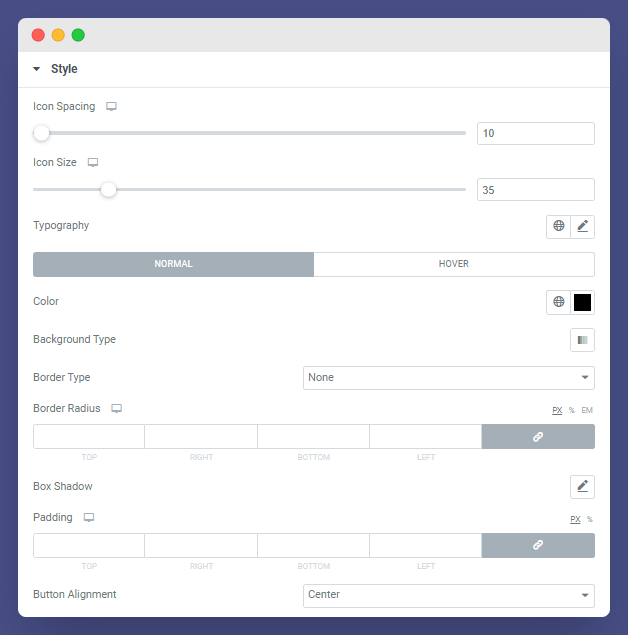
Styling PayPal Donation Button
All Might Addon widgets feature advanced styling options to ensure no one overlooks them.
By editing your icon size, typography, and background color, adjusting the border radius and padding, and changing the button alignment to left, right, or center, under the Style tab, you can style your button in the best way possible.
Wrapping-Up
Now that you know how to add a PayPal donate button to your WordPress website, you are all set to accept donations from your devoted readers.
Let’s summarize a few points before we leave:
- Don’t forget to explain the why’s behind your donation.
- Stylize your button in a way that it doesn’t get mixed up with the site’s design.
- Add a redirect page that honors their donation and offers a freebie in return or a thank-you note.
We hope you find this blog informative! If you have any doubts, feel free to share your thoughts in the comment section below. We will respond to you shortly!


